Dream Sky Tutorial
At first we need to find the background with the cloud. I found this one image, download it with clicking on the image and Save Image:
Step 1
Now I wanted to get more brighter colors, so get Your image settings window with Image–>Adjustments–>Brightness/Contrast. Play with the settings, I got something like this:
Step 2
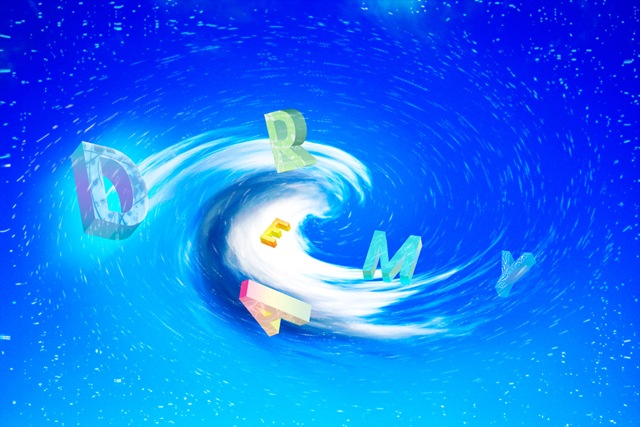
Now I wanted to get wave effect, so the cloud will look like more whirlwind. Go to the Filter–>Distort–>Twirl, Zoom out a little bit to see the preview window with -/+ and use settings like mine to get this effect.
Step 3
Okay, now You must open Illustrator, to get 3D letters, You can use Xara 3D to get even better results, but although I know not many people use this program, I used Illustrator. Use light gray color and broad font, ~850pt for better results, to add 3D effect – Effect–>3D–> Extrude&Bevel.
Check “Preview” checkbox to see preview, change extrude depth to 150pt and rotate object until You are satisfied. Repeat those steps changing letters and adding different rotation settings.
Step 4
When You are finished just copy and paste letters from Illustrator to Photoshop, each letter on the separate layer.
Rename all the layers so You can easier navigate between them later. Resize letters, rotate them to look better.
Step 5
To get little more brighter colors, duplicate background layer and change blending mode to Overlay.
Step 6
Now I wanted to get more interesting and dreamy result, so follow me to these steps:
There are many ways to create this effect, but I used this one. Ok, create new layer and move it to the top.
Switch to Pen tool and create something like this:
Step 7
Switch to brush(B) tool, choose round brush with hardness 0%, then again switch to Pen tool, right click on the curve, Stroke path, use brush and simulate pressure. After that, right click on the path again and Delete path.
Step 8
Now let’s get to the exciting part:
Filter–>Distort–>Wave and use these settings:
Step 9
The next step is to swirl those bits so use again Filter–>Distort–>Twirl and use maximal angle – 999 and hit OK.
Now Change blending mode to Color Dodge and add Outer Glow.
Now You should be the same result as me:
Step 10
Ok, let’s move on, we should add colors to the letters, select letter D layer and with magic wand tool click on the white area, add new layer (CTRL+SHIFT+N),name it “D front” and fill it with color ( ALT+DELETE). We are doing this step for later use, so we could add brushes on the front of the letter and different colors:
Step 11
Now return to D letter layer, add gradient overlay in blending options, change mode to overlay and reduce opacity, to save 3D look and shapes. Add gradient like You want, play with colors until You are satisfied.
Step 12
Now select “D front” layer, add color overlay or gradient overlay, and add similar color like You did to D letter, just little more brighter, because it’s front of the letter. In the next step we will add brushes to the letter front to get a little bit cooler result. Use Your own brushes, anything it doesn’t really matters – just do the job until it feels good. To do the trick and add brushes only to the letter front, create new layer above the “D front” and add it as layer mask. You can do it holding ALT and hovering between D front and mask layer and clicking between them.
Now with mask layer selected press F5 to get brush popup panel, press B to switch to brush, and brush something over the D letter front. Again feel free to experiment with different brushes, colors, and blending options. If You have no brushes to use check this list with 42 free nature and floral brushes.
I used white color and then added different blending options, outer glow to do the job. Repeat steps 10-11-12 to the rest of the letters, adding different settings, colors and brushes.
My result is like this, click to the image to see it full size:
Download PSD version